Firmware

Debugging USB Traffic in Linux

Debugging USB interacting code in Linux is possible in several ways, if you have a graphical interface you can rely on Wireshark, otherwise you can just use the text based interface to the usb monitor on the Linux Kernel.

In any case you always should start by finding your device Bus and Device number, for example:

sudo lsusb
sudo lsusb -v -d 1234:5678 # VID:PID

May output something like

Bus 002 Device 005: ID 1234:5678 YourDevice

If you are going with Wireshark, just filter with this:

usb.bus_id == 2 && usb.device_address == 5

If you want to use the kernel USB monitoring support manually, you can do:

sudo mount -t debugfs none /sys/kernel/debug
sudo modprobe usbmon

Then, you are ready to get traces for your device traffic, every usb bus has it’s own tracing output, for our example device it’s bus 2, we can find the output in that bus logger:

sudo cat /sys/kernel/debug/usb/usbmon/2u

If you want to filter for your specific device number (5 in this case)

sudo cat /sys/kernel/debug/usb/usbmon/2u | grep ":2:005:"

This is example output for a device on bus 1, device number 048:

majopela@f41:~/jumpstarter$ sudo cat /sys/kernel/debug/usb/usbmon/1u | grep "1:048"
ffff890ed46d9d80 3228854484 S Io:1:048:1 -115:1 64 = 11000000 002838f7 fd7f0000 04000000 00000000 96824000 00000000 00000000
ffff890ed46d9d80 3228855971 C Io:1:048:1 0:1 64 >
ffff890ed46d9d80 3228856073 S Ii:1:048:1 -115:1 64 <
ffff890ed46d9d80 3228856970 C Ii:1:048:1 0:1 64 = 0111d738 04a00411 04300020 00d30559 cabd6080 08116800 8410a0a0 b449120d
ffff890ed46d9d80 3233917728 S Io:1:048:1 -115:1 64 = 01000000 80969bdf fe7f0000 04000000 00000000 96824000 00000000 00000000
ffff890ed46d9d80 3233918971 C Io:1:048:1 0:1 64 >
ffff890ed46d9d80 3233919066 S Ii:1:048:1 -115:1 64 <
ffff890ed46d9d80 3233919971 C Ii:1:048:1 0:1 64 = 0101d738 04a00411 04300020 00d30559 cabd6080 08116800 8410a0a0 b449120d
ffff890ed46d9d80 3238289526 S Io:1:048:1 -115:1 64 = 21000000 f0d4061e fd7f0000 04000000 00000000 96824000 00000000 00000000
ffff890ed46d9d80 3238290830 C Io:1:048:1 0:1 64 >
ffff890ed46d9d80 3238290888 S Ii:1:048:1 -115:1 64 <
ffff890ed46d9d80 3238291829 C Ii:1:048:1 0:1 64 = 0101d738 04a00411 04300020 00d30559 cabd6080 08116800 8410a0a0 b449120d
Secure Boot and Linux Kernel Modules

Secure Boot is a feature of the UEFI (Unified Extensible Firmware Interface) specification that ensures that each software used in the boot process is signed with a key that’s recognized by the system’s firmware (the UEFI BIOS). The purpose is to protect the boot process against bootkit attacks that could inject malicious code.

secure boot image, a key being inserted into a computer screen.

When the system starts up, the firmware checks the signature of each piece of boot software, including the bootloader. If any software isn’t correctly signed with a trusted key, the firmware doesn’t allow the system to boot.

In Linux, the bootloader (i.e., GRUB2) loads the kernel, which again checks the signature to make sure it’s valid. This can also extend to kernel modules via a Linux kernel feature called module signature verification. When this feature is enabled (CONFIG_MODULE_SIG), the kernel checks the signature of each module before it loads the module. If a module’s signature is invalid or if it’s unsigned, the kernel refuses to load the module.

This only provides security if Secure Boot is enabled.

The effectiveness of this entire process depends on the management and protection of the cryptographic keys used to sign the bootloader, kernel, and kernel modules. The private keys used to sign these components must be stored securely to prevent unauthorized access, and the public keys must be correctly installed in the firmware and/or the kernel keyring to allow signature verification to be carried out. If these keys are mishandled, the security of the boot process can be compromised.

Signing kernel modules

To sign a Linux kernel module, you’ll need to generate a signing key pair and then use that key pair to sign the module, so you should first:

  1. Generate a key pair (or use one you have already registered with MOK)
openssl req -new -x509 -newkey rsa:2048 -keyout MOK.priv -outform DER -out MOK.der -nodes -days 36500 -subj "/CN=Your Name/"

This command generates a new 2048-bit RSA key pair, with the private key written to MOK.priv and the public key is written to MOK.der in DER format.

  1. Sign the kernel module:

To sign a kernel module, you can use the kmodsign command in Linux. kmodsign takes the module, the private key, and the public key as arguments:

/usr/src/kernels/$(uname -r)/scripts/sign-file sha512 ./MOK.priv ./MOK.der path/to/module.ko

This signs the module at path/to/module.ko using the private key in ./MOK.priv and the public key in ./MOK.der, with SHA-512 as the hash algorithm.

Please note that the signature is appended to the binary file; it’s not an ELF section. Using strip on the .ko would remove the signature.

Enrolling MOKs (Machine Owner Keys)

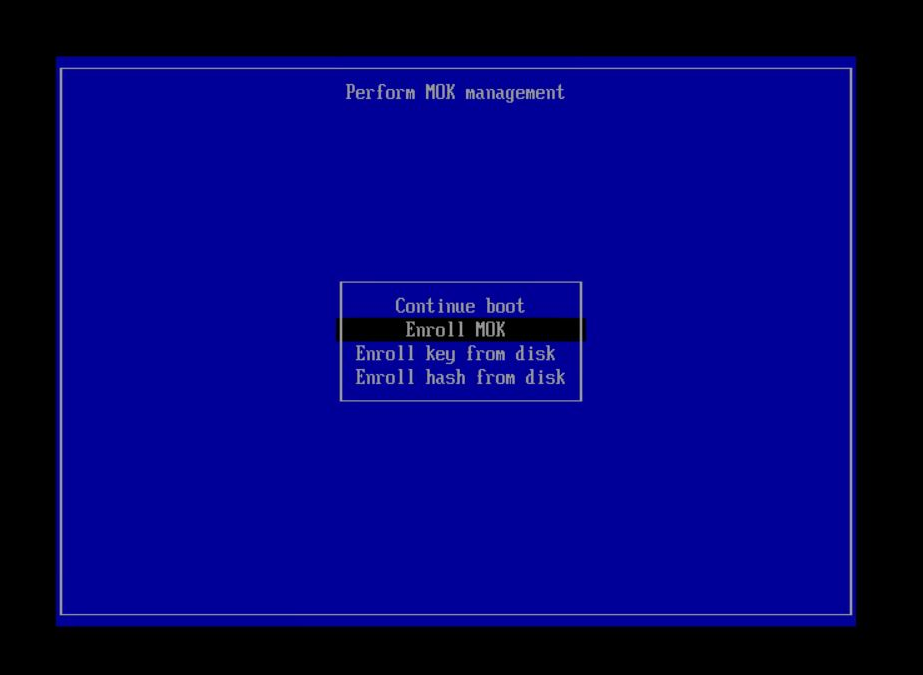
Before the kernel accepts a signed module, we need to enroll the public key into the Machine Owner Key (MOK) list. This can be done using the mokutil command:

mokutil --import MOK.der

This will prompt you to enter a password, which will be required to complete the enrollment process on the next reboot.

UEFI MOK management console

After reboot, once the key is installed, you can list it via:

mokutil -l

You can verify the keys being loaded also by looking at the kernel output:

$ dmesg | grep "integrity:"
[ 0.040036] integrity: Platform Keyring initialized
[ 0.131398] integrity: Loading X.509 certificate: UEFI:MokListRT
[ 0.131512] integrity: Loaded X.509 cert 'Red Hat Secure Boot (CA key 1): 4016841644ce3a810408050766e8f8a29c65f85c'